Why This Cheeseburger Bowl Meal Prep Saves My Weeknights
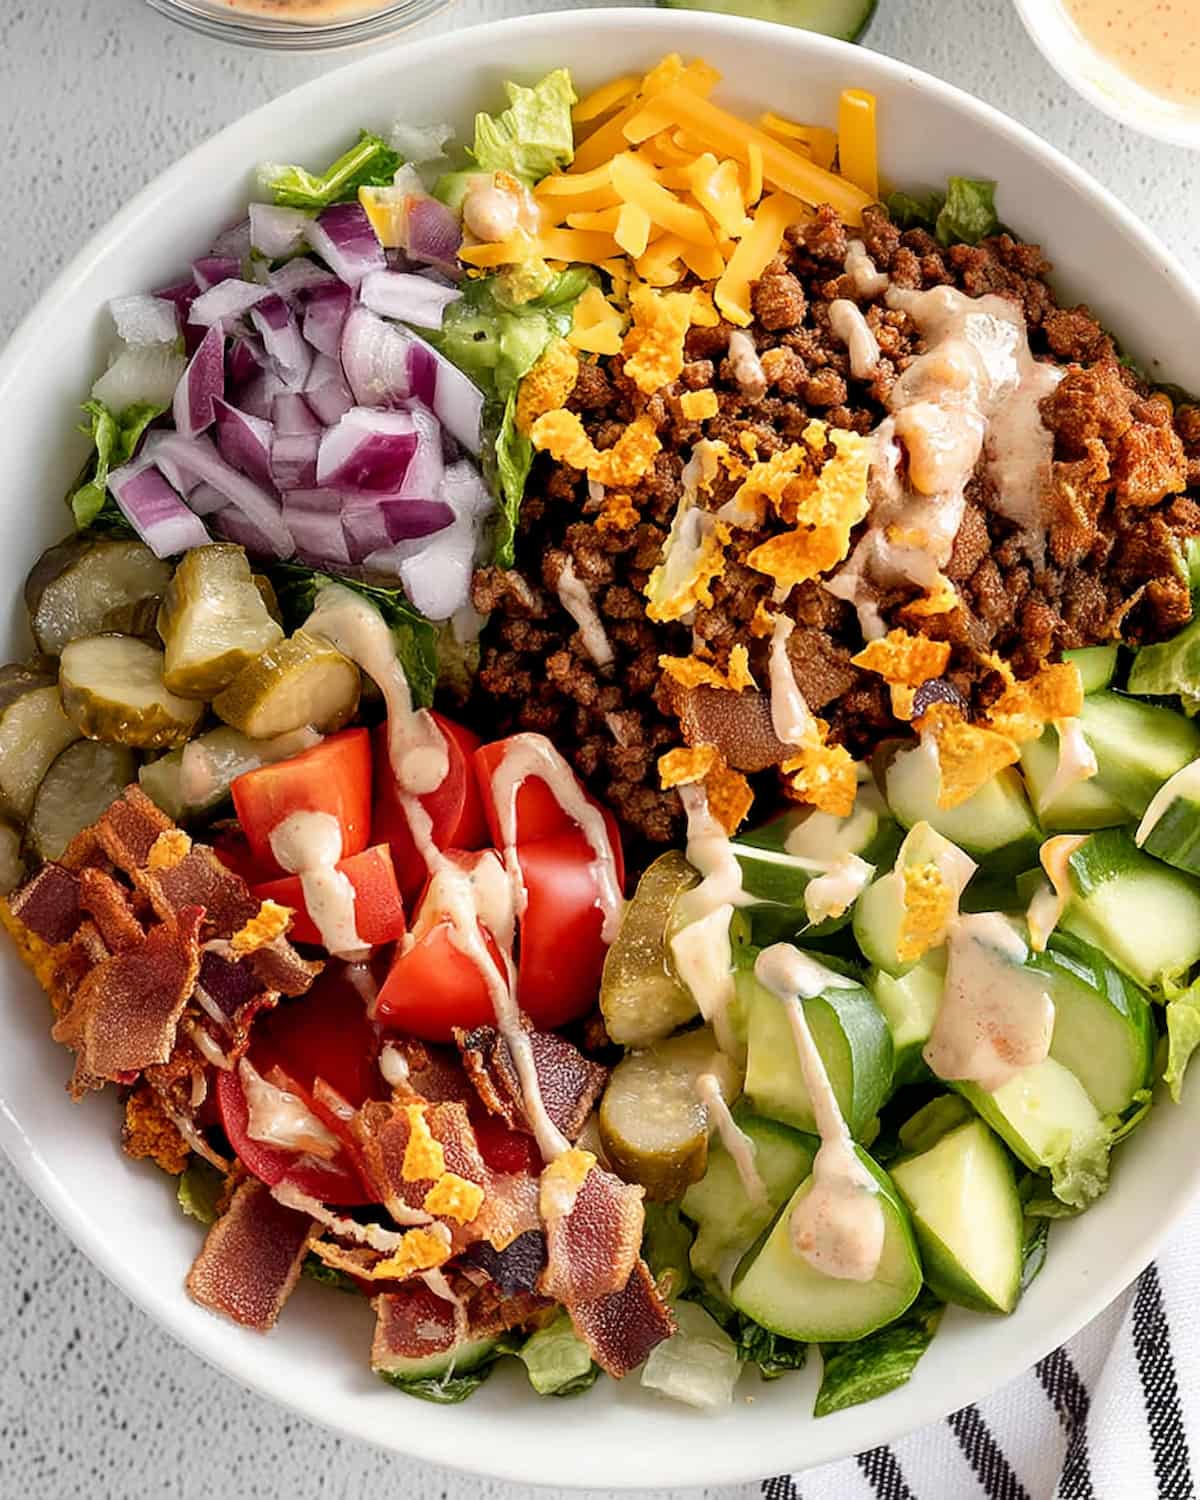
These bowls pack all the burger flavor without the Wednesday night chaos. Seasoned ground beef stays juicy in BPA free meal prep containers, and the fresh toppings don’t get soggy if you layer them right.
I prep five days’ worth every Sunday morning while Emma helps measure out the spices. Rachel actually requests these during tax season because they’re faster than her usual desk lunch.
The whole batch takes about 90 minutes from start to labeled containers in the fridge.
✅ Perfectly portioned beef holds up 5 days
✅ Kid approved toppings station style
✅ Budget ground beef chub feeds the family
✅ Reheats in under 2 minutes
✅ Works with brown rice alternative too
This recipe came from that Sunday when I realized we were eating takeout burgers twice a week. Not sustainable for anyone’s wallet or meal plan.
What Makes These Cheeseburger Bowls Actually Meal Prep Ready
The cheeseburger bowl meal prep magic starts with choosing ingredients that actually survive the week in containers.
I always use lean ground beef because the 85-90% ratio doesn’t leave pools of grease after reheating. Learned that one the hard way when Jake’s lunch leaked all over his backpack in 2022.
✔ Ground beef : 85-90% lean ratio, not the budget ground beef chub this time for better texture after storage
✔ Iceberg and romaine blend : stays crisp way longer than fancy spring mix
✔ Ranch dressing base : Litehouse Lite version or regular, whatever’s at Sendik’s
✔ Shredded cheddar : pre-shredded for speed, freshly grated if you’ve got the time
✔ Thick cut bacon : cooked extra crispy so it doesn’t get chewy in the fridge
The vegetables need to be dry before they go into containers. Like, really dry. Emma knows to pat everything with paper towels during our Sunday prep sessions.
How to Batch Cook Beef for Cheeseburger Bowls Fast
Getting these cheeseburger bowl meal prep containers ready is faster than you’d think. I do this in between loading the dishwasher and checking if Noodle’s trying to steal food off the counter again.
The key is cooking the beef in a nonstick skillet batch cook without crowding. More surface contact means better browning.
- Season the beef : Mix all spices directly into raw meat using clean hands
- Brown in batches : Cook beef in nonstick skillet over medium-high without stirring too much
- Drain properly : Pour off excess fat but leave a little for flavor
- Cool completely : Spread on a sheet pan for 15 minutes before portioning
- Prep the sauce : Whisk ranch, BBQ sauce, mustard and smoked paprika in a bowl
- Chop everything : Dice veggies into uniform pieces while beef cools
- Portion into containers : Beef on bottom, lettuce on top, toppings in separate compartments, similar to taco bowls meal prep
The cooling step isn’t optional anymore. After March 2022, I don’t take chances with food safety Dad’s voice is always in my head saying “bad food storage kills them.”
5 Day Cheeseburger Bowl Lunch Meal Prep Variations
First time I made these, Rachel mentioned she’d love a lower carb version for tax season lunches.
Loaded Nacho Style
Swap the lettuce for crushed Doritos as the base layer. Add jalapeños and swap cheddar for pepper jack.
The Doritos get slightly soft by day three but honestly that’s when they taste best. Jake won’t touch this version but Emma requests it specifically.
Breakfast Bowl Version
Use the same seasoned beef but add scrambled eggs, hash browns, and American cheese slices. Ranch dressing becomes hot sauce mixed with sour cream.
I prep these Saturday nights when we have leftover beef from dinner. They reheat better than any drive-thru breakfast.
BBQ Ranch Remix
Double the BBQ sauce in the dressing and add crispy fried onions on top. Use steamed white rice as the base instead of lettuce for something heartier, similar to ground beef and rice meal prep.
This variation came from using what was already in the pantry one Sunday. Now it’s Rachel’s go-to request.
Honestly these bowls work with whatever vegetables you’ve got that need using up before the next farmers market run.
My Favorite Ways to Serve Cheeseburger Bowl Meal Prep
Rachel eats hers cold straight from the fridge during her 15-minute lunch breaks. I prefer warming just the beef portion for about 60 seconds then adding it to the cold toppings.
With Sweet Potato Fries on the Side
Air fry frozen sweet potato fries while you reheat the beef. The sweet and savory combo reminds me of those Wisconsin supper clubs where everything comes with a side of fries.
Wrapped in Butter Lettuce Leaves
Use the bowl contents as taco filling with large butter lettuce leaves. Emma discovered this method when she wanted “burger tacos” one Wednesday.
Over Cauliflower Rice for Low Carb
Steam a bag of cauliflower rice and use it as the base. Cuts the carbs in half and adds another serving of vegetables.
The best part about these bowls is everyone customizes their own from the portioned containers. No arguments about pickles or onions.
Meal Prep Tips That Actually Work for Cheeseburger Bowls
Glass containers with snap lids changed everything after the Great Container Disaster of 2022. Noodle can’t even drag these ones off the counter anymore.
Portion control matters : I use a ⅓ cup scoop for the beef so each container gets exactly the same amount. Makes the weekly grocery budget predictable.
Layer strategically : Beef and bacon go in one compartment, lettuce and vegetables in another. The dressing stays in those tiny 2-ounce containers I bought in bulk from Costco.
Cool before storing : Let everything reach room temperature before sealing the lids. Condensation makes lettuce soggy and nobody wants that on Thursday. Same cool-and-portion routine as lasagna meal prep.
Label with dates : I write the prep date on blue painter’s tape stuck to each lid. First in, first out, just like Dad taught me during his catering days.
These tips came from actual mistakes. The cheap plastic containers leaked sauce all over Jake’s backpack and the school called about the smell. We upgraded to glass that same weekend.
How Long Cheeseburger Bowl Meal Prep Stays Fresh
The cheeseburger bowl meal prep with rice and veggies stores better than most salads if you keep components separated properly.
Storage
- At room temperature : Don’t leave assembled bowls out longer than 2 hours, especially with ranch dressing
- In the fridge : 5 days in airtight containers with beef and veggies in separate compartments, labeled with date
- In the freezer : Cooked beef freezes up to 3 months but don’t freeze the fresh vegetables or dressing
After March 2022, I’m paranoid about proper cooling time before everything goes into the fridge. Biology degree plus Dad’s catering lessons mean I don’t take shortcuts with food safety.
Reheating
- Microwave just the beef compartment for 60-90 seconds until steaming hot, like chicken and broccoli meal prep. The vegetables and lettuce stay cold and crisp.
- If you froze the beef, thaw overnight in the fridge then reheat thoroughly. Add a tiny splash of water to prevent drying out.
- The bacon stays crispy if you store it separately and only add it right before eating.
Anti-waste tip
Leftover beef makes incredible quesadillas the next day. Just add cheese between two tortillas and crisp in a skillet.
Got more questions? The most common ones are right below.
Meal Prep Cheeseburger Bowl Questions Everyone Asks
Last Sunday when Emma was helping portion everything, she asked the same question you’re probably thinking.
Can I prep cheeseburger bowls for the whole week?
Yes, these stay fresh for 5 days when beef and vegetables are stored in separate compartments with proper cooling before refrigeration.
Why did my meal prep containers leak sauce everywhere?
Happened to me too with cheap containers. Switch to glass with snap lids and store dressing separately in small 2-ounce containers.
What’s the best way to reheat cheeseburger bowl meal prep?
Microwave only the beef portion for 60-90 seconds. Keep the lettuce and vegetables cold for best texture contrast.
Can I use brown rice alternative instead of lettuce?
Absolutely. Steamed white rice or brown rice alternative works great as the base and makes the bowls more filling for bigger appetites.
The Full Cheeseburger Bowl Meal Prep Recipe
This cheeseburger bowl meal prep recipe makes five grab-and-go lunches that actually taste good on day five. The seasoned beef stays juicy, the vegetables stay crisp, and Rachel texts me photos during her lunch break with fire emojis.
I started making these after realizing we were spending $60 a week on takeout burgers. Now the whole batch costs about $25 and feeds us better.
Cheeseburger Bowl Meal Prep with Ranch BBQ Sauce
Equipment
- Large nonstick skillet
- Mixing bowls
- Sheet pan
- Glass meal prep containers with compartments
- Small 2-ounce dressing containers
- Kitchen scale or measuring cups
- Salad spinner or paper towels
- Microwave
Ingredients
- 1 lb lean ground beef (85–90%)
- 1 tsp chili powder
- 1 tsp smoked paprika
- 1/2 tsp kosher salt
- 1/2 tsp garlic granules
- 1/2 tsp onion powder
- 1/4 tsp freshly ground black pepper
- 1/2 cup ranch dressing Lite or regular
- 1 tbsp BBQ sauce
- 1/2 tsp Dijon mustard
- 1/4 tsp smoked paprika for dressing
- 3 cups shredded iceberg lettuce
- 3 cups chopped romaine about 1 heart
- 1 cup cucumber finely diced
- 1 cup tomato finely diced
- 1 large avocado cubed; add fresh when eating
- 1/2 cup sliced pickles
- 1/4 cup red onion minced
- 3/4 cup shredded cheddar cheese
- 6 strips thick-cut bacon cooked and crumbled
- to taste crushed Doritos optional topping
Instructions
- Mix all beef seasonings (chili powder, smoked paprika, salt, garlic granules, onion powder, black pepper) into the raw ground beef with your hands until evenly combined.
- Heat a large nonstick skillet over medium-high. Add the seasoned beef and cook 8–10 minutes, breaking into crumbles, until browned and no pink remains.
- Drain off excess grease, leaving about 1 tablespoon in the skillet for flavor.
- Spread cooked beef on a sheet pan and let cool completely for 15–20 minutes before portioning (for food safety and better texture).
- In a bowl, whisk together ranch dressing, BBQ sauce, Dijon mustard, and smoked paprika to make the BBQ ranch dressing.
- Wash and thoroughly dry all vegetables using paper towels or a salad spinner to remove moisture.
- Dice cucumber, tomato, and red onion into small, uniform pieces for easy eating and even distribution.
- Portion cooled beef into 5 equal servings (use a 1/3-cup scoop for consistency).
- In compartmented meal prep containers, add the lettuce blend to one side. Top with cucumber, tomato, pickles, and red onion.
- Add the cooled beef to the second compartment and top with shredded cheddar and crumbled bacon.
- Divide dressing into small containers (about 2 tablespoons per serving).
- Seal containers and label with the prep date.
- Refrigerate immediately and use within 5 days.
- To serve, reheat the beef for 60–90 seconds if desired, then combine with cold veggies and drizzle with dressing. Add avocado fresh before eating.
Notes
- Storage: Keep beef and vegetables in separate compartments; dressing in small containers. Refrigerate up to 5 days. Do not leave assembled bowls at room temperature for more than 2 hours.
- Freezer: Cooked beef can be frozen up to 3 months. Thaw overnight in the fridge before reheating. Do not freeze fresh vegetables or dressing.
- Reheating: Microwave only the beef compartment for 60–90 seconds until hot; keep lettuce and veggies cold for best texture. Add bacon right before eating to maintain crispness.
- Make-ahead timing: Prep on Sunday morning for grab-and-go lunches through Thursday. Ensure beef cools to room temperature on a sheet pan for 15–20 minutes before sealing containers to prevent condensation and soggy greens.
- Layering: Place beef and bacon in one compartment, lettuce and vegetables in another, and keep dressing separate to avoid sogginess.
- Avocado: Add fresh right before serving to prevent browning.
- Equipment tip: Use glass containers with snap lids and label with prep dates for easy FIFO rotation.
- Variations: Swap lettuce for rice or cauliflower rice for different carb levels; Doritos topping for a nacho-style bowl; increase BBQ sauce for a BBQ ranch remix.
Share Your Cheeseburger Bowl Meal Prep Success
These cheeseburger bowl meal prep containers saved my Wednesday nights when Rachel’s working late and the kids need dinner fast.
If you make these, I’d love to see how they turned out. Drop a comment below or tag @NextWeekMeals on Instagram with #NextWeekMeals so I can see your Sunday prep session.
Rate this recipe with the stars above if you tried it. Your feedback helps other parents figure out if this’ll work for their family too.